Hoppa till huvudinnehåll

Hur skickar jag e-post med kopiering och klistrar in ett angivet intervall i e-postkroppen i Excel?

I många fall kan ett visst innehållsintervall i Excel-kalkylblad vara användbart i din e-postkommunikation. I den här artikeln kommer vi att introducera en metod för att skicka ett e-postmeddelande med angivet intervall som klistras in i e-postkroppen direkt i Excel.

Skicka e-post med ett angivet intervall klistrat in i e-posttexten i Excel
Skicka e-post med ett angivet intervall klistrat in i e-postkroppen med ett fantastiskt verktyg

Fler handledning för utskick i Excel ...


Skicka e-post med ett angivet intervall klistrat in i e-posttexten i Excel

Följande VBA-kod kan hjälpa dig att kopiera ett intervall och klistra in det i en Outlook-e-postkropp direkt i Excel. Gör så här.

1. I kalkylbladet innehåller det intervall du behöver kopiera, tryck på andra + F11 samtidigt för att öppna Microsoft Visual Basic för applikationer fönster.

2. I öppningen Microsoft Visual Basic för applikationer klicka på fönstret verktyg > Referensprojekt som nedan visas skärmdump.

3. I Referenser - VBAProject dialogrutan, vänligen hitta och kontrollera Microsoft Outlook-objektbibliotek och klicka sedan på OK knapp.

4. klick Insert > Modulerna, kopiera och klistra in nedanstående VBA-kod i modulfönstret.

VBA-kod: Skicka e-post med ett angivet intervall klistrat in i e-postkroppen i Excel

Sub Send_Email()
'Updated by Extendoffice 20200119
    Dim xRg As Range
    Dim I, J As Long
    Dim xAddress As String
    Dim xEmailBody As String
    Dim xMailOut As Outlook.MailItem
    Dim xOutApp As Outlook.Application    
    On Error Resume Next
    xAddress = ActiveWindow.RangeSelection.Address
    Set xRg = Application.InputBox("Please select range you need to paste into email body", "KuTools For Excel", xAddress, , , , , 8)
If xRg Is Nothing Then Exit Sub
Application.ScreenUpdating = False
    Set xOutApp = CreateObject("Outlook.Application")
    Set xMailOut = xOutApp.CreateItem(olMailItem)
    For I = 1 To xRg.Rows.Count
        For J = 1 To xRg.Columns.Count
            xEmailBody = xEmailBody & "  " & xRg.Cells(I, J).value
        Next
        xEmailBody = xEmailBody & vbNewLine
    Next
    xEmailBody = "Hi" & vbLf & vbLf & " body of message you want to add" & vbLf & vbLf & xEmailBody & vbNewLine
    With xMailOut
        .Subject = "Test"
        .To = ""
        .Body = xEmailBody
        .Display
        '.Send
    End With
    Set xMailOut = Nothing
    Set xOutApp = Nothing
    Application.ScreenUpdating = True
End Sub

Anmärkningar:

  • 1). Ändra e-postadressen i rad xEmailBody = "Hej" & vbLf & vbLf & "meddelande som du vill lägga till" & vbLf & vbLf & xEmailBody & vbNewLine som du behöver.
  • 2). Vänligen ange din e-postmottagare och ämne (.Till = och .Subject = "test") rader i koden.

5. tryck på F5 för att köra koden. I pop-up Kutools för Excel dialogrutan, välj det intervall du behöver klistra in i e-posttexten och klicka sedan på OK knapp. Se skärmdump:

6. Nu skapas ett e-postmeddelande med angiven mottagare, ämne, kropp och valt Excel-intervall, klicka på Skicka knappen för att skicka detta e-postmeddelande. Se skärmdump som visas.

Anmärkningar: VBA-koden fungerar bara när du använder Outlook som ditt e-postprogram.


Skicka e-post med ett angivet intervall klistrat in i e-postkroppen med ett fantastiskt verktyg

Om du inte använder Outlook och ändå vill skicka e-postmeddelanden direkt i Excel med angiven intervalldata klistrad inuti rekommenderar jag starkt Skicka e-mail nytta av Kutools för Excel till dig. Med den här funktionen behöver du bara konfigurera den utgående servern för en e-postadress och sedan skicka e-postmeddelanden i Excel direkt via den här e-postadressen i framtiden.

Innan du ansöker Kutools för ExcelBer ladda ner och installera det först.

1. För det första måste du förbereda en e-postlista med nödvändiga fält.

  • tips: E-postlistan måste innehålla minst två rader, och den första raden måste vara rubrikerna (antar att du vill skicka e-post till två e-postadresser i Excel, skriv in dessa två e-postadresser med rubriken "E-post" som nedanstående skärmdump visas ).
  • Alternativt kan du enkelt skapa en e-postlista med Skapa e-postlista särdrag.

2. Välj det intervall som du vill lägga till data till e-postkroppen och tryck på ctrl + C nycklar för att kopiera den.

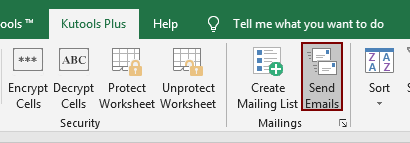
3. Välj hela e-postlistan (inkludera rubriker), klicka Kutools Plus > Skicka e-mail. Se skärmdump:

4. Sedan Skicka e-mail dialogrutan dyker upp.

  • 4.1) Objekt i den valda e-postlistan fylls i motsvarande fält (du kan lägga till fler fält i e-postlistan efter behov);
  • 4.2) Klicka på rutan för e-post och tryck på ctrl + V för att klistra in den valda områdesdata i den. Därefter lägger du till annat innehåll efter behov;
  • 4.3 Avmarkera kryssrutan Skicka e-post via Outlook låda;
  • 2.4) Klicka på Inställningar för utgående server knapp. Se skärmdump:

5. Sedan Inställningar för utgående server (SMTP) - nytt schema dialogrutan dyker upp. Fyll i e-postadressen med dess serverinställningar, ange en mapp för att spara alla skickade e-postmeddelanden efter att ha kontrollerat Spara skickade e-postmeddelanden till och klicka sedan på OK knappen för att spara inställningarna.

6. När den återgår till Skicka e-mail dialogrutan, klicka på Skicka knappen för att skicka e-postmeddelandet.

Från och med nu kan du skicka e-postmeddelanden med den här funktionen i Excel direkt.

  Om du vill ha en gratis provperiod (30 dagar) av det här verktyget, klicka för att ladda ner den, och gå sedan till för att tillämpa operationen enligt ovanstående steg.


Relaterade artiklar:

Skicka e-post till e-postadresser som anges i celler i Excel
Antag att du har en lista med e-postadresser och att du vill skicka e-postmeddelanden till dessa e-postadresser i bulk direkt i Excel. Hur uppnår man det? Den här artikeln visar metoder för att skicka e-post till flera e-postadresser som anges i celler i Excel.

Infoga Outlook-signatur när du skickar e-post i Excel
Om du antar att du vill skicka ett e-postmeddelande direkt i Excel, hur kan du lägga till standard Outlook-signaturen i detta e-postmeddelande? Den här artikeln innehåller två metoder som hjälper dig att lägga till Outlook-signatur när du skickar e-post i Excel.

Skicka e-post med flera bilagor bifogade i Excel
Den här artikeln talar om att skicka ett e-postmeddelande via Outlook med flera bilagor bifogade i Excel.

Skicka e-post om förfallodatum har uppnåtts i Excel
Till exempel, om förfallodagen i kolumn C är mindre än eller lika med 7 dagar (nuvarande datum är 2017/9/13), skicka sedan en e-postpåminnelse till den angivna mottagaren i kolumn A med specificerat innehåll i kolumn B. uppnå det? Den här artikeln ger en VBA-metod för att hantera den i detalj.

Skicka automatiskt e-post baserat på cellvärde i Excel
Antar att du vill skicka ett e-postmeddelande via Outlook till en viss mottagare baserat på ett angivet cellvärde i Excel. Till exempel, när värdet på cell D7 i ett kalkylblad är större än 200, skapas ett e-postmeddelande automatiskt. Den här artikeln introducerar en VBA-metod för dig att snabbt lösa problemet.

Fler handledning för utskick i Excel ...

Bästa kontorsproduktivitetsverktyg

🤖 Kutools AI Aide: Revolutionera dataanalys baserat på: Intelligent utförande   |  Generera kod  |  Skapa anpassade formler  |  Analysera data och generera diagram  |  Anropa Kutools funktioner.
Populära funktioner: Hitta, markera eller identifiera dubbletter   |  Ta bort tomma rader   |  Kombinera kolumner eller celler utan att förlora data   |   Rund utan formel ...
Superuppslag: Flera kriterier VLookup    VLookup med flera värden  |   VSök över flera ark   |   Fuzzy Lookup ....
Avancerad rullgardinslista: Skapa snabbt en rullgardinslista   |  Beroende rullgardinslista   |  Flervals-rullgardinslista ....
Kolumnhanterare: Lägg till ett specifikt antal kolumner  |  Flytta kolumner  |  Växla synlighetsstatus för dolda kolumner  |  Jämför intervall och kolumner ...
Utvalda funktioner: Rutnätsfokus   |  Designvy   |   Stor formelbar    Arbetsbok & Bladhanterare   |  Resursbibliotek (Automatisk text)   |  Datumväljare   |  Kombinera arbetsblad   |  Kryptera/Dekryptera celler    Skicka e-postmeddelanden efter lista   |  Superfilter   |   Specialfilter (filtrera fet/kursiv/genomstruken...) ...
Topp 15 verktygssatser12 text verktyg (lägga till text, Ta bort tecken, ...)   |   50+ Diagram Typer (Gantt Chart, ...)   |   40+ Praktiskt Formler (Beräkna ålder baserat på födelsedag, ...)   |   19 Införande verktyg (Infoga QR-kod, Infoga bild från sökväg, ...)   |   12 Konvertering verktyg (Siffror till ord, Valutaväxling, ...)   |   7 Slå ihop och dela verktyg (Avancerade kombinera rader, Dela celler, ...)   |   ... och mer

Uppgradera dina Excel-färdigheter med Kutools för Excel och upplev effektivitet som aldrig förr. Kutools för Excel erbjuder över 300 avancerade funktioner för att öka produktiviteten och spara tid.  Klicka här för att få den funktion du behöver mest...

Beskrivning


Fliken Office ger ett flikgränssnitt till Office och gör ditt arbete mycket enklare

  • Aktivera flikredigering och läsning i Word, Excel, PowerPoint, Publisher, Access, Visio och Project.
  • Öppna och skapa flera dokument i nya flikar i samma fönster, snarare än i nya fönster.
  • Ökar din produktivitet med 50 % och minskar hundratals musklick för dig varje dag!
Comments (22)
Rated 4.5 out of 5 · 1 ratings
This comment was minimized by the moderator on the site
The only issue is that the format of the table is not maintained in the mail. Can you let me know how do we preserve the format of the table in the mail, I have the same issue, could you see if you could update it please, otherwise this is excellent.
Many thanks
Rated 4.5 out of 5
This comment was minimized by the moderator on the site
Hi Andy Mitchell,
If you want to maintain the format of the table, the following VBA script can do you a favor. Please give it a try. Thank you.
Sub Send_Email()
'Updated by Extendoffice 20220616
    Dim xRg As Range
    Dim I, J As Long
    Dim xAddress As String
    Dim xMailOut As Object
    Dim xOutApp As Object
    On Error Resume Next
    Set xOutApp = CreateObject("Outlook.Application")
    Set xMailOut = xOutApp.CreateItem(olMailItem)
    xAddress = ActiveWindow.RangeSelection.Address
    Set xRg = Application.InputBox("Please select range you need to paste into email body", "KuTools For Excel", xAddress, , , , , 8)
If xRg Is Nothing Then Exit Sub
Application.ScreenUpdating = False
    Set xOutApp = CreateObject("Outlook.Application")
    Set xMailOut = xOutApp.CreateItem(olMailItem)
    With xMailOut
        .Subject = "Test"
        .To = ""
        .HTMLBody = RangetoHTML(xRg)
        .Display
        '.Send
    End With
    Set xMailOut = Nothing
    Set xOutApp = Nothing
    Application.ScreenUpdating = True
End Sub

 ' The following VBA script is cited from this page:
 ' https://stackoverflow.com/questions/18663127/paste-excel-range-in-outlook
Function RangetoHTML(rng As Range)
' By Ron de Bruin.
    Dim fso As Object
    Dim ts As Object
    Dim TempFile As String
    Dim TempWB As Workbook

    TempFile = Environ$("temp") & "/" & Format(Now, "dd-mm-yy h-mm-ss") & ".htm"

    'Copy the range and create a new workbook to past the data in
    rng.Copy
    Set TempWB = Workbooks.Add(1)
    With TempWB.Sheets(1)
        .Cells(1).PasteSpecial Paste:=8
        .Cells(1).PasteSpecial xlPasteValues, , False, False
        .Cells(1).PasteSpecial xlPasteFormats, , False, False
        .Cells(1).Select
        Application.CutCopyMode = False
        On Error Resume Next
        .DrawingObjects.Visible = True
        .DrawingObjects.Delete
        On Error GoTo 0
    End With

    'Publish the sheet to a htm file
    With TempWB.PublishObjects.Add( _
         SourceType:=xlSourceRange, _
         Filename:=TempFile, _
         Sheet:=TempWB.Sheets(1).Name, _
         Source:=TempWB.Sheets(1).UsedRange.Address, _
         HtmlType:=xlHtmlStatic)
        .Publish (True)
    End With

    'Read all data from the htm file into RangetoHTML
    Set fso = CreateObject("Scripting.FileSystemObject")
    Set ts = fso.GetFile(TempFile).OpenAsTextStream(1, -2)
    RangetoHTML = ts.ReadAll
    ts.Close
    RangetoHTML = Replace(RangetoHTML, "align=center x:publishsource=", _
                          "align=left x:publishsource=")

    'Close TempWB
    TempWB.Close savechanges:=False

    'Delete the htm file we used in this function
    Kill TempFile

    Set ts = Nothing
    Set fso = Nothing
    Set TempWB = Nothing
End Function
This comment was minimized by the moderator on the site
This worked perfectly, thank you so much.
I can now add my spin on it to get it doing what I need.
This comment was minimized by the moderator on the site
Hi Paul Johnson,

Very happy to help you solve the problem. Have a good day at work.
This comment was minimized by the moderator on the site
hello,
can you help me on below
I have create excel sheet & updated 10 supplier mail detailI have send mail through excel to all 10 supplier with individual sheet attachment with individual mail.
I want to paste excel data in outlook body instead of attachment in mail
can any one help me
This comment was minimized by the moderator on the site
Hi,
Instead of selecting the range, I want to select multiple pivots in the excel.
can you please help me.
This comment was minimized by the moderator on the site
Hi,
Instead of selecting the range manually, I want to select the range automatically.
This comment was minimized by the moderator on the site
Hi Raman,
In the below code, please replace the range "A1:C5" in line Set xRg = Range("A1:C5") with your own range.

Sub Send_Email()
Dim xRg As Range
Dim I, J As Long
Dim xAddress As String
Dim xEmailBody As String
Dim xMailOut As Outlook.MailItem
Dim xOutApp As Outlook.Application
On Error Resume Next
xAddress = ActiveWindow.RangeSelection.Address
Set xRg = Range("A1:C5")
If xRg Is Nothing Then Exit Sub
Application.ScreenUpdating = False
Set xOutApp = CreateObject("Outlook.Application")
Set xMailOut = xOutApp.CreateItem(olMailItem)
For I = 1 To xRg.Rows.Count
For J = 1 To xRg.Columns.Count
xEmailBody = xEmailBody & " " & xRg.Cells(I, J).Value
Next
xEmailBody = xEmailBody & vbNewLine
Next
xEmailBody = "Hi" & vbLf & vbLf & " body of message you want to add" & vbLf & vbLf & xEmailBody & vbNewLine
With xMailOut
.Subject = "Test"
.To = ""
.Body = xEmailBody
.Display
'.Send
End With
Set xMailOut = Nothing
Set xOutApp = Nothing
Application.ScreenUpdating = True
End Sub
This comment was minimized by the moderator on the site
Hi experts, Do we have updates on how the format maintained?
This comment was minimized by the moderator on the site
Hi Ther,
Can't figure it out. Sorry for that.
This comment was minimized by the moderator on the site
i am seeing a compile error (User-defined type not defined". Please help me out to overcome this.
This comment was minimized by the moderator on the site
Hi,
Please get into the Reference window by clicking Tools > references. Scroll down to find and check the Microsoft Outlook Object Library box and click the OK button to finish the setting.
This comment was minimized by the moderator on the site
this is pasting as a text. Kindly suggest how to send the table or the same format which is copied from the excel.
This comment was minimized by the moderator on the site
Code to send automatically after selecting after ok
This comment was minimized by the moderator on the site
Hi
This code is vary excellent, by using the code i have completed my 90% of my project.
I have same issue as mentioned by Anirudh that is table formatting. How can i format the table in email.
Please help me......
This comment was minimized by the moderator on the site
Good Day,
The problem can't be solved yet. Sorry for the inconvenience and thank you for your comment.
This comment was minimized by the moderator on the site
Hi, Is there any update on below.......
This comment was minimized by the moderator on the site
Hi, Also I Wanted code for "Filter by Date".
I am working on project, on that project I wanted to filter the data by the date, actually we have filter/hide the and last 05 days to current date data and we have highlight all other data.
Please help me to complete this project.
Your help is very great-full for me.
This comment was minimized by the moderator on the site
This is great. It is working as expected. The only issue is that the format of the table is not maintained in the mail. Can you let me know how do we preserve the format of the table in the mail
There are no comments posted here yet
Load More
Please leave your comments in English
Posting as Guest
×
Rate this post:
0   Characters
Suggested Locations