Hur skriver man automatiskt ut bilagor när e-postmeddelanden kommer in i Outlook?
Den här handledningen visar en metod för att kombinera ett VBA-skript och en Outlook-regel för att hjälpa dig att automatiskt skriva ut bilagor till vissa e-postmeddelanden när de kommer till Outlook.
Skriv ut bilagor automatiskt när vissa e-postmeddelanden kommer
Om du antar att du vill skriva ut bilagor av inkommande e-postmeddelanden från en viss avsändare automatiskt. Du kan göra enligt följande för att få det gjort.
Steg 1: Skapa ett skript i Outlook
Först måste du skapa ett VBA-skript i Outlook.
1. Starta din Outlook, tryck på andra + F11 samtidigt för att öppna Microsoft Visual Basic för applikationer fönster.
2. I Microsoft Visual Basic för applikationer fönster, dubbelklicka på Project1 > Microsoft Outlook-objekt > ThisOutlookSession att öppna ThisOutlookSession (kod) och kopiera sedan följande kod till detta kodfönster.
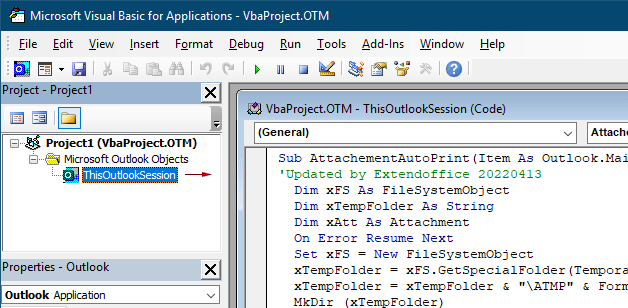
VBA-kod 1: Skriv automatiskt ut bilagor (alla typer av bilagor) när mejl kommer in
Sub AttachementAutoPrint(Item As Outlook.MailItem)
'Updated by Extendoffice 20230223
  Dim xFS As FileSystemObject
  Dim xTempFolder As String
  Dim xAtt As Attachment
  Dim xShell As Object
  Dim xFolder As Object, xFolderItem As Object
  Dim xFileName As String
  On Error GoTo xError
  If Item.Attachments.Count = 0 Then Exit Sub
  Set xFS = New FileSystemObject
  xTempFolder = xFS.GetSpecialFolder(TemporaryFolder)
  xTempFolder = xTempFolder & "\ATMP" & Format(Item.ReceivedTime, "yyyymmddhhmmss")
  If Not xFS.FolderExists(xTempFolder) Then
    MkDir (xTempFolder)
  End If
  Set xShell = CreateObject("Shell.Application")
  Set xFolder = xShell.NameSpace(0)
  For Each xAtt In Item.Attachments
    If IsEmbeddedAttachment(xAtt) = False Then
      xFileName = xTempFolder & "\" & xAtt.FileName
      xAtt.SaveAsFile (xFileName)
      Set xFolderItem = xFolder.ParseName(xFileName)
      xFolderItem.InvokeVerbEx ("print")
    End If
  Next xAtt
  Set xFS = Nothing
  Set xFolder = Nothing
  Set xFolderItem = Nothing
  Set xShell = Nothing
xError:
  If Err <> 0 Then
    MsgBox Err.Number & " - " & Err.Description, , "Kutools for Outlook"
    Err.Clear
  End If
Exit Sub
End Sub

Function IsEmbeddedAttachment(Attach As Attachment)
Dim xItem As MailItem
Dim xCid As String
Dim xID As String
Dim xHtml As String
On Error Resume Next
IsEmbeddedAttachment = False
Set xItem = Attach.Parent
If xItem.BodyFormat <> olFormatHTML Then Exit Function
xCid = ""
xCid = Attach.PropertyAccessor.GetProperty("http://schemas.microsoft.com/mapi/proptag/0x3712001F")
If xCid <> "" Then
    xHtml = xItem.HTMLBody
    xID = "cid:" & xCid
    If InStr(xHtml, xID) > 0 Then
        IsEmbeddedAttachment = True
    End If
End If
End Function
Notera: Den här koden stöder utskrift av alla typer av bilagor som tas emot i e-postmeddelanden. Om du bara vill skriva ut den angivna typen av bilaga, såsom pdf-filer, använd följande VBA-kod.
VBA-kod 2: Skriv ut automatiskt den angivna typen av bilagor när e-postmeddelanden kommer
Sub AttachementAutoPrint(Item As Outlook.MailItem)
'Updated by Extendoffice 20230223
  Dim xFS As FileSystemObject
  Dim xTempFolder As String
  Dim xAtt As Attachment
  Dim xShell As Object
  Dim xFolder As Object, xFolderItem As Object
  Dim xFileType As String, xFileName As String
  On Error GoTo xError
  If Item.Attachments.Count = 0 Then Exit Sub
  Set xFS = New FileSystemObject
  xTempFolder = xFS.GetSpecialFolder(TemporaryFolder)
  xTempFolder = xTempFolder & "\ATMP" & Format(Item.ReceivedTime, "yyyymmddhhmmss")
  If Not xFS.FolderExists(xTempFolder) Then
    MkDir (xTempFolder)
  End If
  Set xShell = CreateObject("Shell.Application")
  Set xFolder = xShell.NameSpace(0)
  For Each xAtt In Item.Attachments
    If IsEmbeddedAttachment(xAtt) = False Then
      xFileName = xAtt.FileName
      xFileType = LCase$(Right$(xFileName, VBA.Len(xFileName) - VBA.InStrRev(xFileName, ".")))
      xFileName = xTempFolder & "\" & xFileName
      Select Case xFileType
        Case "pdf"   'change "pdf" to the file extension you want to print
          xAtt.SaveAsFile (xFileName)
          Set xFolderItem = xFolder.ParseName(xFileName)
          xFolderItem.InvokeVerbEx ("print")
      End Select
    End If
  Next xAtt
  Set xFS = Nothing
  Set xFolder = Nothing
  Set xFolderItem = Nothing
  Set xShell = Nothing
xError:
  If Err <> 0 Then
    MsgBox Err.Number & " - " & Err.Description, , "Kutools for Outlook"
    Err.Clear
  End If
  Exit Sub
End Sub

Function IsEmbeddedAttachment(Attach As Attachment)
Dim xItem As MailItem
Dim xCid As String
Dim xID As String
Dim xHtml As String
On Error Resume Next
IsEmbeddedAttachment = False
Set xItem = Attach.Parent
If xItem.BodyFormat <> olFormatHTML Then Exit Function
xCid = ""
xCid = Attach.PropertyAccessor.GetProperty("http://schemas.microsoft.com/mapi/proptag/0x3712001F")
If xCid <> "" Then
    xHtml = xItem.HTMLBody
    xID = "cid:" & xCid
    If InStr(xHtml, xID) > 0 Then
        IsEmbeddedAttachment = True
    End If
End If
End Function
Anmärkningar:
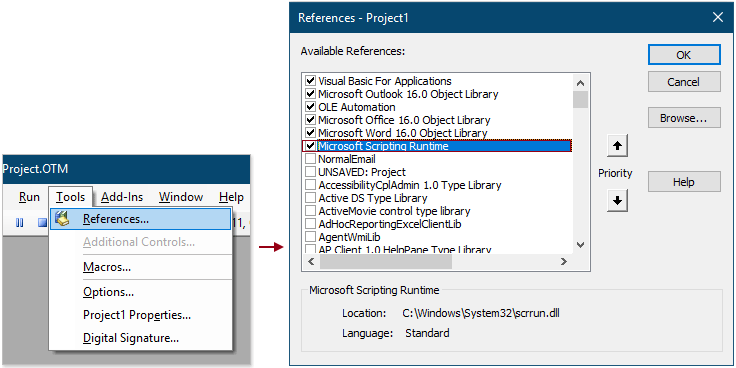
3. Gå vidare och klicka verktyg > Referenser. I poppar upp Referenser – Projekt1 dialogrutan, kolla på Microsoft Scripting Runtime och klicka sedan på OK knapp.
4. Spara koden och tryck på andra + Q för att stänga Microsoft Visual Basic för applikationer fönster.
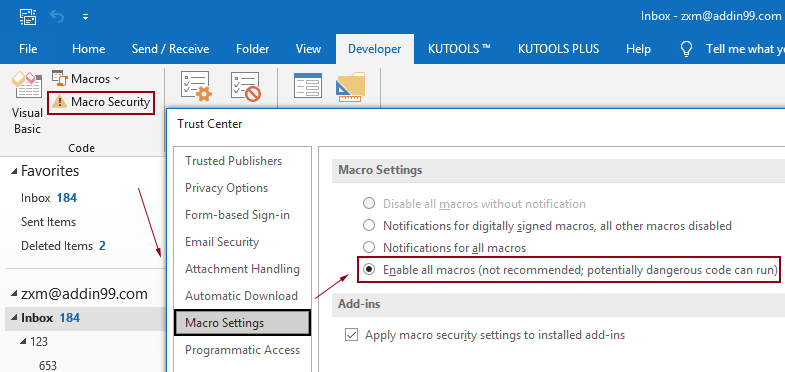
Notera: Se till att Aktivera alla makron alternativet är aktiverat i din Outlook. Du kan markera det här alternativet genom att följa stegen nedan.
Steg 2: Bygg en regel för att använda skriptet
Efter att ha lagt till VBA-skriptet i Outlook måste du skapa en regel för att använda skriptet baserat på vissa villkor.
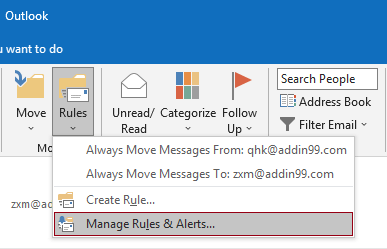
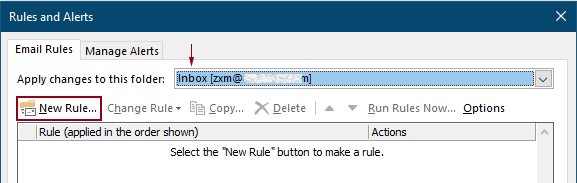
1. Gå till fliken Hem, klicka regler > Hantera regler och varningar.
2. I Regler och varningar dialogrutan, klicka på Ny regel för att skapa en regel.
Tips: Om du har lagt till flera e-postkonton till din Outlook, vänligen ange ett konto i Tillämpa ändringar på den här mappen rullgardinsmenyn där du vill tillämpa regeln. Annars kommer det att tillämpas på inkorgen för det för närvarande valda e-postkontot.
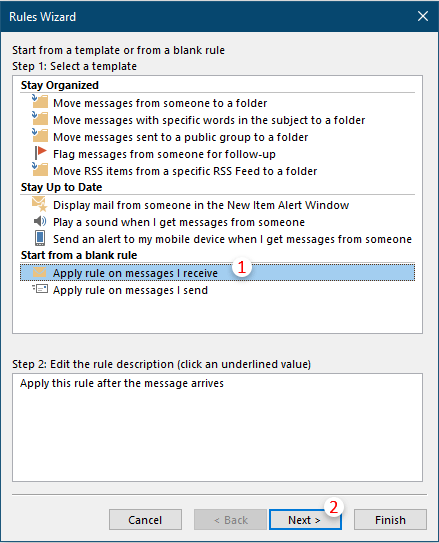
3. I den första Regelguiden dialogrutan väljer du Använd regel för meddelanden jag får i steg 1 rutan och klicka sedan på Nästa.
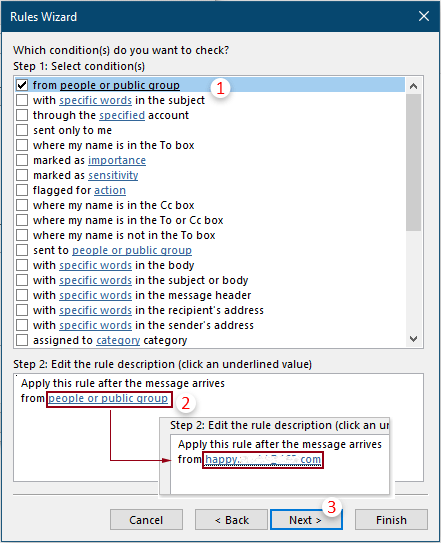
4. På sekunden Regelguiden dialogrutan måste du:
5. I det tredje Regelguiden i dialogrutan måste du konfigurera enligt följande.
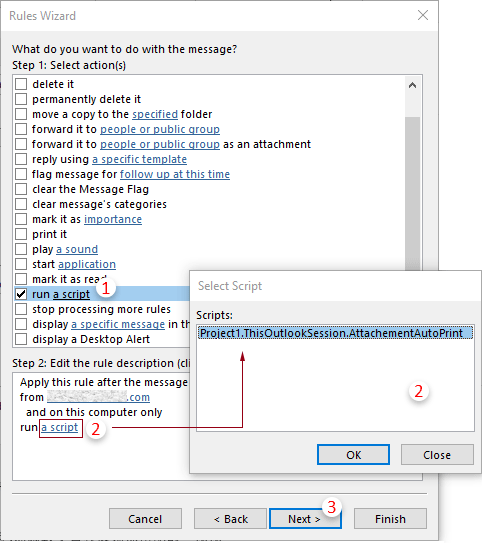
Tips: Om "kör ett skript”-alternativet saknas i din Regelguiden, kan du visa den genom att följa metoden som nämns i den här artikeln: återställ saknad Kör ett skript-pption i Outlook-regeln.
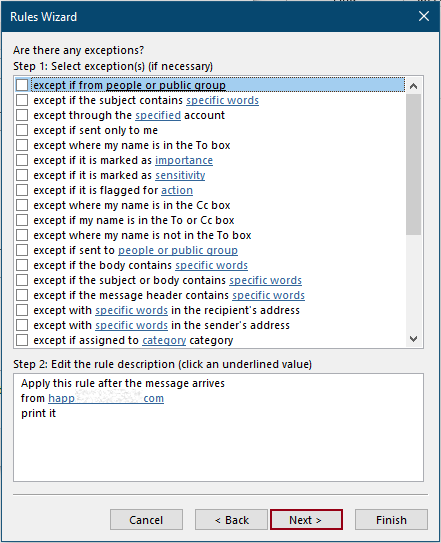
6. Sedan en till Regelguiden dyker upp och frågar efter undantag. Du kan välja undantagen om det behövs, annars klickar du på Nästa knapp utan några val.
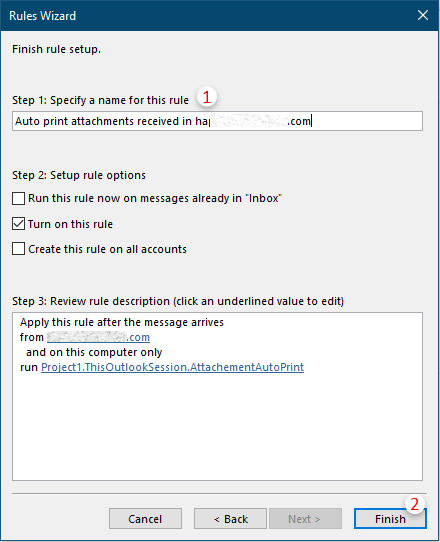
7. I det sista Regelguidenmåste du ange ett namn för regeln och klicka sedan på Finish knapp.
8. Sedan återgår den till Regler och varningar dialogrutan kan du se regeln du skapade listad inuti, klicka på OK för att avsluta alla inställningar.
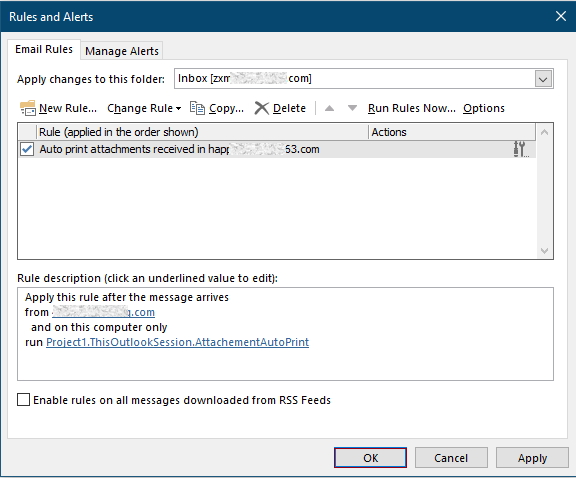
Från och med nu, när ett e-postmeddelande från den angivna personen tas emot, kommer de bifogade filerna att skrivas ut automatiskt.
Relaterade artiklar
Skriv endast ut bilagor från ett e-postmeddelande eller valda e-postmeddelanden i Outlook
I Outlook kan du skriva ut mejlen, men har du skrivit ut bilagorna endast från ett mejl eller valda mejl i Outlook? Den här artikeln introducerar knepen för att lösa det här jobbet.
Skriv bara ut meddelanderubriken för ett e-postmeddelande i Outlook
När du skriver ut ett e-postmeddelande i Outlook kommer det att skriva ut både meddelandehuvud och meddelandetext i e-postmeddelandet. Men i vissa speciella fall kan du bara behöva skriva ut meddelandehuvudet med ämne, avsändare, mottagare etc. Den här artikeln kommer att introducera två lösningar för att göra det.
Skriv ut en kalender i ett specificerat/anpassat datumintervall i Outlook
Normalt, när du skriver ut en kalender i månadsvy i Outlook, kommer den automatiskt att välja månaden som innehåller det aktuella valda datumet. Men du kan behöva skriva ut kalendern inom ett anpassat datumintervall, såsom 3 månader, halvår, etc. Den här artikeln presenterar lösningen för dig.
Skriv ut en kontakt med bild i Outlook
Normalt skrivs inte ut en kontakts bild när kontakten skrivs ut i Outlook. Men ibland blir det mer imponerande att skriva ut en kontakt med bilden. Den här artikeln kommer att presentera några lösningar för att få det gjort.
Skriv ut ett urval av ett e-postmeddelande i Outlook
Om du fick ett e-postmeddelande och upptäckte att det finns ett urval av e-postinnehållet måste skrivas ut istället för att skriva ut hela meddelandet, vad skulle du göra? Egentligen kan Outlook hjälpa dig att uppnå denna operation med hjälp av webbläsare, till exempel Firefox och Internet Explorer. Här tar jag till exempel webbläsarna. Se följande handledning.
Bästa kontorsproduktivitetsverktyg
Kutools för Outlook - Över 100 kraftfulla funktioner för att överladda din Outlook
🤖 AI Mail Assistant: Instant proffs-e-postmeddelanden med AI-magi – ett klick för geniala svar, perfekt ton, flerspråkig behärskning. Förvandla e-post utan ansträngning! ...
📧 Email Automation: Frånvaro (tillgänglig för POP och IMAP) / Schemalägg Skicka e-post / Auto CC/BCC enligt regler när du skickar e-post / Automatisk vidarebefordran (avancerade regler) / Lägg automatiskt till hälsning / Dela automatiskt e-postmeddelanden med flera mottagare i individuella meddelanden ...
📨 Email Management: Hämta enkelt e-postmeddelanden / Blockera bluff-e-postmeddelanden av ämnen och andra / Ta bort duplicerade e-postmeddelanden / Avancerad Sökning / Konsolidera mappar ...
📁 Bilagor Pro: Batch Spara / Batch lossa / Batchkomprimera / Automatisk sparning / Auto Lossa / Automatisk komprimering ...
🌟 Gränssnittsmagi: 😊 Fler vackra och coola emojis / Öka din Outlook-produktivitet med flikar / Minimera Outlook istället för att stänga ...
👍 Underverk med ett klick: Svara alla med inkommande bilagor / E-postmeddelanden mot nätfiske / 🕘Visa avsändarens tidszon ...
👩🏼🤝👩🏻 Kontakter och kalender: Lägg till kontakter i grupp från valda e-postmeddelanden / Dela upp en kontaktgrupp till individuella grupper / Ta bort påminnelser om födelsedag ...
Över 100 funktioner Vänta på din utforskning! Klicka här för att upptäcka mer.

